公開日:
前回 は Amplify DataStore をスタンドアロンで使用しました。
シンプルなインターフェースで使用できるデータストアであることが分かったと思います。
しかし、Amplify DataStore をスタンドアロンで使用するだけでは、その魅力の一割にも満たないです。
Amplify DataStore はネットワーク接続が利用可能であれば AWS AppSync を使用してデータを透過的に同期します。
Amplify DataStore はデータを自動的にバージョン管理し、AppSync を使用してクラウド上で競合の検出と解決を行います。
ネットワーク接続がオフラインになっても Amplify DataStore はローカルのみで機能し続けます。
そして、ネットワークが復旧すれば、アプリケーションは自動的にバックエンドに再接続し、データを同期して、競合がある場合は解決してくれます。
※ 参考 2020/10 Amplify DataStore に新機能 “Selective Sync” が追加されました!
驚くべきことに、この一連の機能を実現するのに、クライアントのコードは 一切何も変更する必要がありません。
Amplify DataStore をスタンドアロンで使用していた際と全く同じコードのまま動作します。
そして、以下の一行を入れるだけで他のデバイスで入れたデータを自動的に受信してローカルストアへ反映させることができるようになります。
はっきりと言えば、AWSを使用しているなら、もう Firebase のことは忘れてください。
DynamoDB のことも AWS AppSync のことも GraphQL のこともいったん忘れて大丈夫です。時代は変わった、パラダイムシフトした のです。
※ 念のために、ここでは Firebase の事を とやかく言いたいのではありません。 Firebase も素晴らしいフレームワーク、ツールチェーンだと思います。 新たに別の強力な選択肢が出来たということです。
Amplify DataStore を AWS に接続する First Step
Amplify DataStore を AWS に接続します。
少し退屈な手順が続きますが、その恩恵は計り知れないものです。
まず、Amplify CLI を最新版にします。
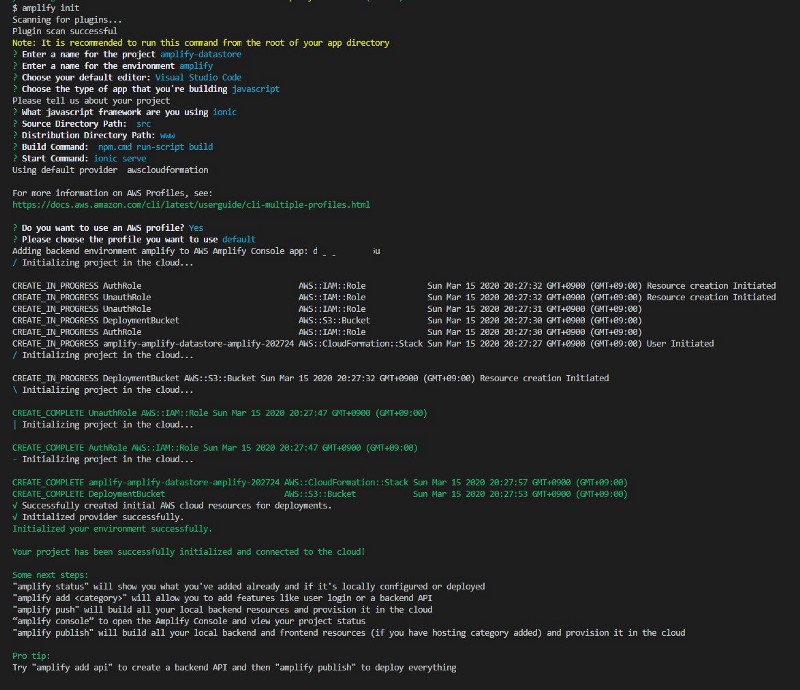
続いて amplify init コマンドを実行します。
$ amplify init
Note: It is recommended to run this command from the root of your app directory
? Enter a name for the project amplify-datastore
? Enter a name for the environment amplify
? Choose your default editor: Visual Studio Code
? Choose the type of app that you’re building javascript
Please tell us about your project
? What javascript framework are you using ionic
? Source Directory Path: src
? Distribution Directory Path: www
? Build Command: npm.cmd run-script build
? Start Command: ionic serve
Using default provider awscloudformation
For more information on AWS Profiles, see:
https://docs.aws.amazon.com/cli/latest/userguide/cli-multiple-profiles.html
? Do you want to use an AWS profile? Yes
? Please choose the profile you want to use default
Adding backend environment amplify to AWS Amplify Console app: abc1de23f4ghi
| Initializing project in the cloud…
CREATE_IN_PROGRESS AuthRole AWS::IAM::Role Tue Mar 17 2020 00:56:47 GMT+0900 (GMT+09:00) Resource creation Initiated
CREATE_IN_PROGRESS UnauthRole AWS::IAM::Role Tue Mar 17 2020 00:56:46 GMT+0900 (GMT+09:00) Resource creation Initiated
CREATE_IN_PROGRESS DeploymentBucket AWS::S3::Bucket Tue Mar 17 2020 00:56:46 GMT+0900 (GMT+09:00)
CREATE_IN_PROGRESS AuthRole AWS::IAM::Role Tue Mar 17 2020 00:56:46 GMT+0900 (GMT+09:00)
CREATE_IN_PROGRESS UnauthRole AWS::IAM::Role Tue Mar 17 2020 00:56:45 GMT+0900 (GMT+09:00)
– Initializing project in the cloud…
CREATE_IN_PROGRESS DeploymentBucket AWS::S3::Bucket Tue Mar 17 2020 00:56:48 GMT+0900 (GMT+09:00) Resource creation Initiated
Initializing project in the cloud…
CREATE_COMPLETE AuthRole AWS::IAM::Role Tue Mar 17 2020 00:57:04 GMT+0900 (GMT+09:00)
CREATE_COMPLETE UnauthRole AWS::IAM::Role Tue Mar 17 2020 00:57:03 GMT+0900 (GMT+09:00)
| Initializing project in the cloud…
CREATE_COMPLETE DeploymentBucket AWS::S3::Bucket Tue Mar 17 2020 00:57:09 GMT+0900 (GMT+09:00)
/ Initializing project in the cloud…
CREATE_COMPLETE amplify-amplify-datastore-amplify-05625 AWS::CloudFormation::Stack Tue Mar 17 2020 00:57:12 GMT+0900 (GMT+09:00)
√ Successfully created initial AWS cloud resources for deployments.
√ Initialized provider successfully.
Initialized your environment successfully.
Your project has been successfully initialized and connected to the cloud!
Some next steps:
“amplify status” will show you what you’ve added already and if it’s locally configured or deployed
“amplify add ” will allow you to add features like user login or a backend API
“amplify push” will build all your local backend resources and provision it in the cloud
“amplify console” to open the Amplify Console and view your project status
“amplify publish” will build all your local backend and frontend resources (if you have hosting category added) and provision it in the cloud
Pro tip:
Try “amplify add api” to create a backend API and then “amplify publish” to deploy everything
余談ですが、この時点で IAMロールや deploy用の S3バケットが用意されるのは、まあ良いんですが、いつの頃からか Amplify Console プロジェクトまで作成されるようになりました。 ネイティブアプリを作る際は Webホスティング機能は不要なので余計ですね。目障りなら削除してしまっても大丈夫です。
この時点でプロジェクトのルートディレクトリ直下に amplifyフォルダが作成され、 amplify/team-provider-info.json を始めとした重要なファイルが作成されています。
AWS 側を定義する
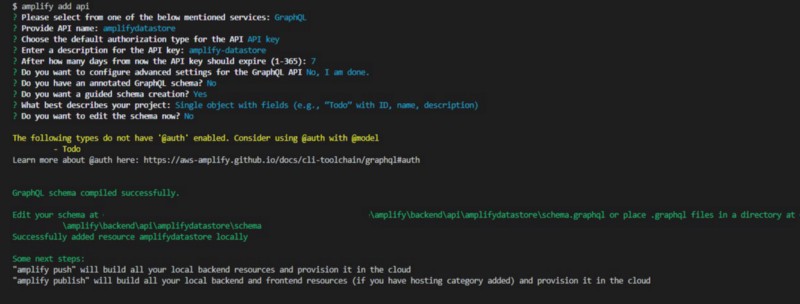
続いて amplify add api コマンドを実行します。
このコマンドにより、Amplify DataStore のクラウド側(AWS AppSync)を作成するための情報が定義されます。
(定義されるだけで、ここではまだ AWSリソースが作成されるわけではありません。)
$ amplify add api
? Please select from one of the below mentioned services: GraphQL
? Provide API name: amplifydatastore
? Choose the default authorization type for the API API key
? Enter a description for the API key: amplify-datastore
? After how many days from now the API key should expire (1-365): 7
? Do you want to configure advanced settings for the GraphQL API No, I am done.
? Do you have an annotated GraphQL schema? No
? Do you want a guided schema creation? Yes
? What best describes your project: Single object with fields (e.g., “Todo” with ID, name, description)
? Do you want to edit the schema now? No
The following types do not have ‘@auth’ enabled. Consider using @auth with @model
– Todo
Learn more about @auth here: https://aws-amplify.github.io/docs/cli-toolchain/graphql#auth
GraphQL schema compiled successfully.
Edit your schema at amplifybackendapiamplifydatastoreschema.graphql or place .graphql files in a directory at amplifybackendapiamplifydatastoreschema
Successfully added resource amplifydatastore locally
Some next steps:
“amplify push” will build all your local backend resources and provision it in the cloud
“amplify publish” will build all your local backend and frontend resources (if you have hosting category added) and provision it in the cloud
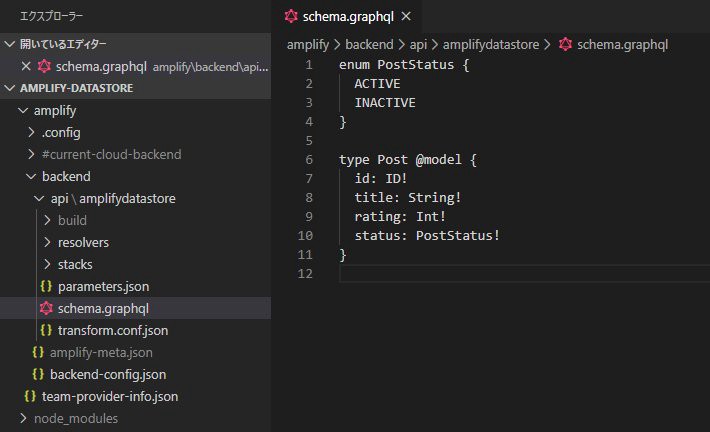
あとは amplify push コマンドを実行すれば AWS上に GraphQLバックエンド(AWS AppSync の API)が作成されるのですが、説明の都合上、ここでは 前回 使用した シンプルなモデルに合わせて、スキーマ・ファイルの内容を編集します。
amplify/backend/api/[自分で付けたAPI名]/schema.graphql を Visual Studio Code で開いて編集します。
保存して amplify codegen model コマンドを実行します。

src/models の下に 以下の 4つのファイルが作成されます。
- src/models/index.d.ts
- src/models/index.js
- src/models/schema.d.ts
- src/models/schema.js
競合の解決方法を指定する
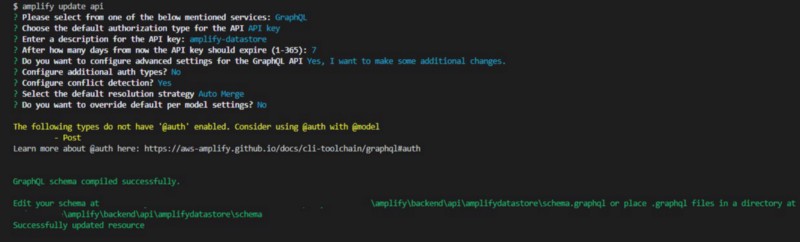
amplify update api コマンドを実行して、競合の解決方法を指定しておきます。
$ amplify update api
? Please select from one of the below mentioned services: GraphQL
? Choose the default authorization type for the API API key
? Enter a description for the API key: amplify-datastore
? After how many days from now the API key should expire (1-365): 7
? Do you want to configure advanced settings for the GraphQL API Yes, I want to make some additional changes.
? Configure additional auth types? No
? Configure conflict detection? Yes
? Select the default resolution strategy Auto Merge
? Do you want to override default per model settings? No
The following types do not have ‘@auth’ enabled. Consider using @auth with @model
– Post
Learn more about @auth here: https://aws-amplify.github.io/docs/cli-toolchain/graphql#auth
GraphQL schema compiled successfully.
amplify/backend/api/[自分で付けたAPI名]/transform.conf.json が以下の内容に変わります。
JavaScript コードを編集する
最後に アプリケーションに AWS に接続する設定を読み込ませることが必要です。src/index.tsx に 太字部分の 3行を追加します。
import React from ‘react’;
import ReactDOM from ‘react-dom’;
import App from ‘./App’;
import * as serviceWorker from ‘./serviceWorker’;
import Amplify from ‘@aws-amplify/core’;
import awsConfig from ‘./aws-exports’;
Amplify.configure(awsConfig);
ReactDOM.render(<App />, document.getElementById(‘root’));
AWS リソースを実際に作成する
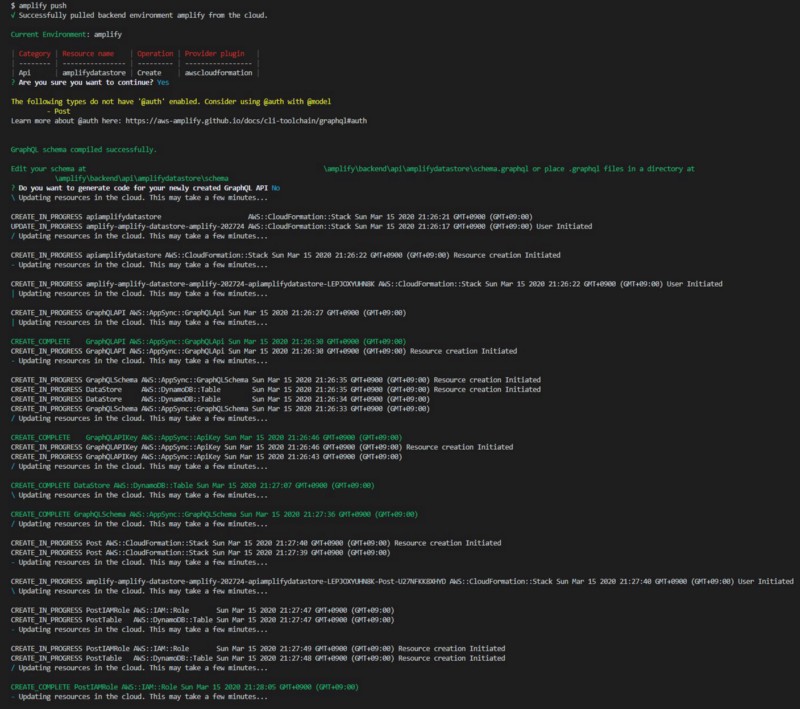
心の準備が整ったら amplify push コマンドを実行します。
$ amplify push
√ Successfully pulled backend environment amplify from the cloud.
Current Environment: amplify
CategoryResource nameOperationProvider pluginApiamplifydatastoreCreateawscloudformation? Are you sure you want to continue? Yes
The following types do not have ‘@auth’ enabled. Consider using @auth with @model
– Post
Learn more about @auth here: https://aws-amplify.github.io/docs/cli-toolchain/graphql#auth
GraphQL schema compiled successfully.
Edit your schema at amplifybackendapiamplifydatastoreschema.graphql or place .graphql files in a directory at amplifybackendapiamplifydatastoreschema
? Do you want to generate code for your newly created GraphQL API No
– Updating resources in the cloud. This may take a few minutes…

動作を試してみる
これで、 Amplify DataStore がクラウドに繋がり、魔法の力を手に入れました。
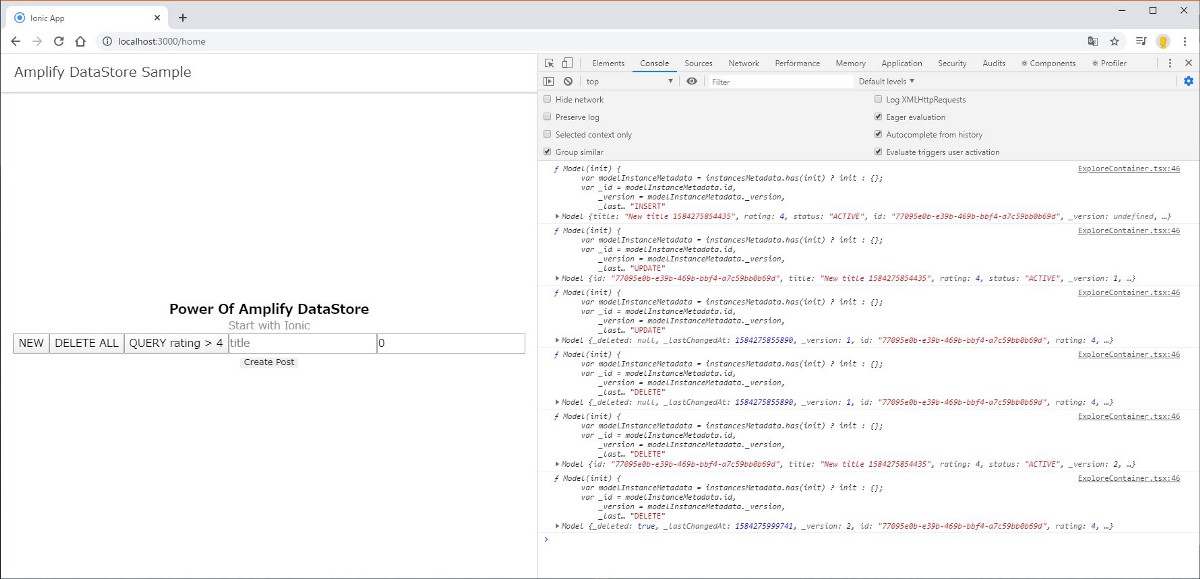
早速、npm start コマンドで Ionic アプリを起動し「NEW」ボタンを押してみます。
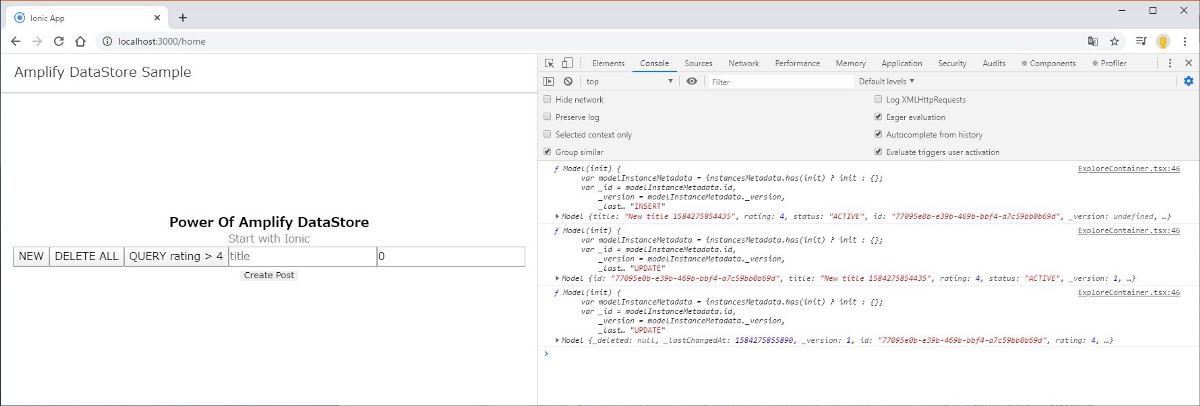
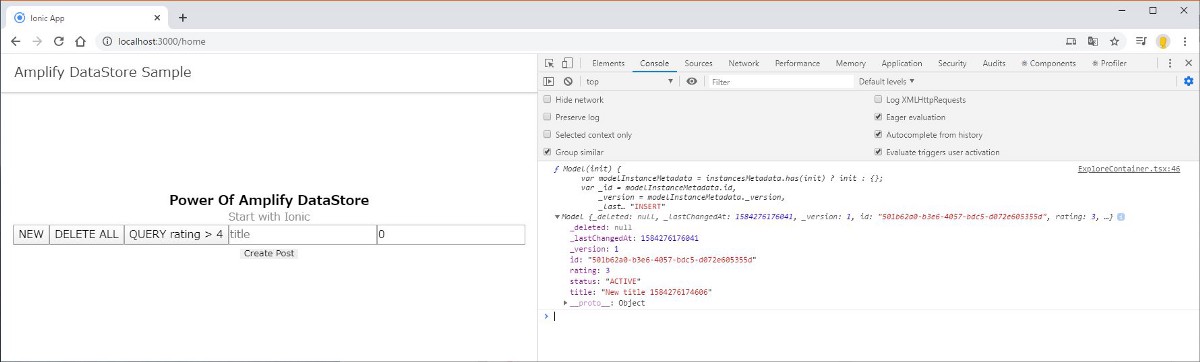
スタンドアロン動作時は 1回のみだった Model(init) が 計 3回走り、2回目の際に _version 属性が、3回目で _lastChangeAtに値が入れられたことが分かります。
Webブラウザで AWSマネージメントコンソール画面にログインし、 DynamoDB を見てみます。
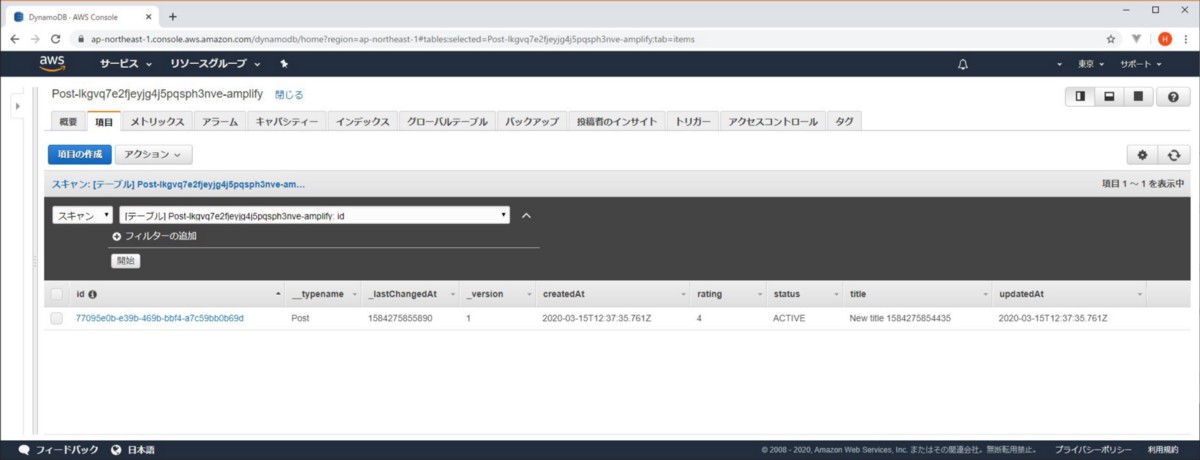
新しいテーブルが作成されていて、さきほど「NEW」したデータが入っています。
データを削除してみる
Ionicアプリ上で「DELETE ALL」してみましょう。
DynamoDB のアイテムが更新され、`_deleted` 属性に true がセットされ、 また TTL属性が付けられています。
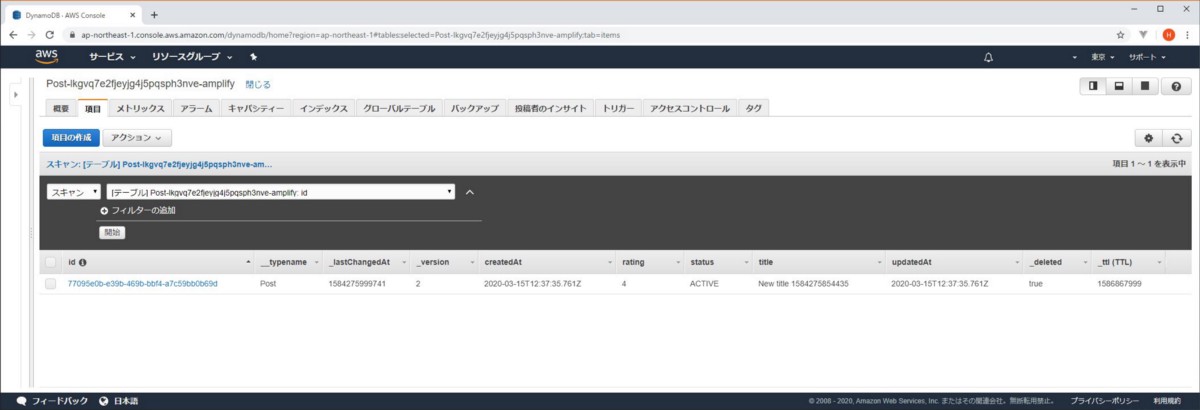
DynamoDB 上のデータに削除フラグが付けられ、一定時間(TTL)経過後に実際に(自動的に)削除される仕組みということですね。
ネットワーク接続が切れた状態(オフライン時)の動作を確認してみる
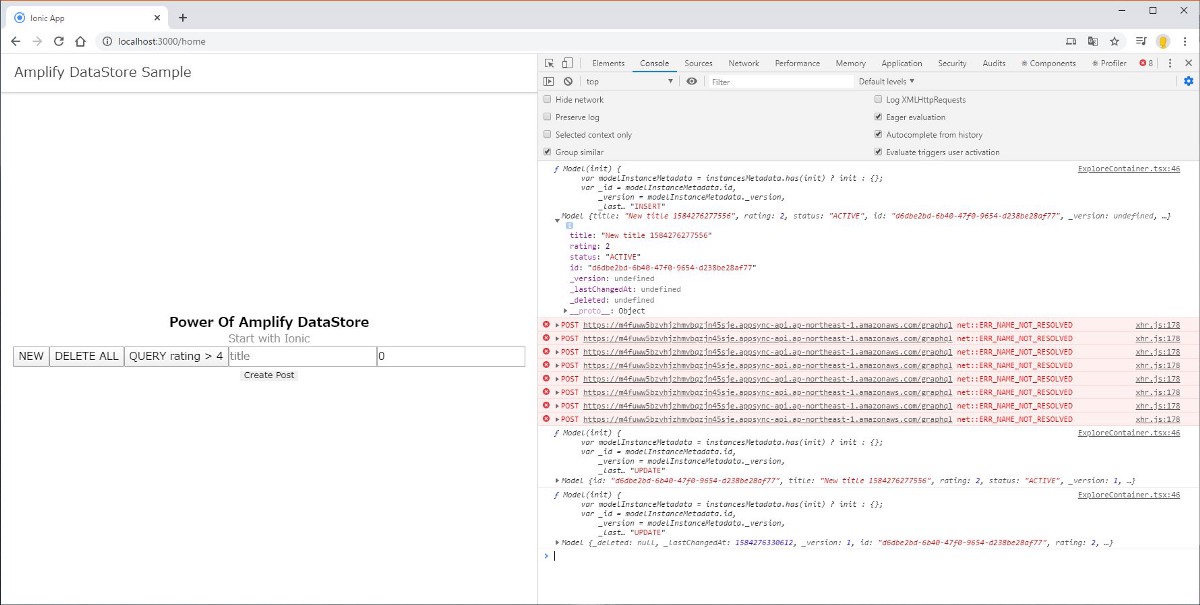
次はネットワーク回線を切断した状態で「NEW」します。
ローカルストアにはデータが入りますが、クラウドには送信できないので Exponential Backoff 、つまり失敗する度にタイミングを 指数関数的に遅らせながら 再試行を続けます。
ネットワーク回線の復旧を検知すると、何事もなかったかのように自動的にクラウドへの送信を行います。
他のデバイスから入力したデータが反映されることを確認する
他のデバイスで同じアプリを起動して「NEW」した場合はどうなるか?
自動的にクラウド(AWS AppSync を介して DynamoDB )へ反映され、 DataStore.observe(Post).subscribe によって他のデバイスへも自動的、透過的に伝搬されます。
まとめ
Amplify DataStore の素晴らしさについて、これ以上 余計な説明は必要ないと思います。
アプリとバックエンドとの間で REST API を使用して CRUD 処理を行っているなら Amplify DataStore を導入してみてください。
これまでのところ DynamoDB の知識も AWS AppSync や GraphQL についても、ほとんど何も知らなくてもクラウド連携ソリューションを構築することができました。
もし望むなら DynamoDB Streams を使用すれば Amplify DataStore と他のデータソースを連動させる機能を実装することも可能です。
そこまで Deep Dive する必要を感じない場合は AppSync の設定画面を開く必要も DynamoDB の使いづらい API を叩く必要もありません。
もし、今回作成したソリューションについて、もう十分堪能したので不要だという場合には amplify delete コマンドを実行すると クラウド(AWS)上のリソースは全て綺麗に消えてなくなります。